

How to remove the front bumper and grille on a 2011-2013 Dodge Charger
This project was performed on my 2013 Dodge Charger R/T. These instructions are a recollection of my experience and the process I used on my own vehicle. Follow these instructions AT YOUR OWN RISK, I will accept NO RESPONSIBILITY if your car is damaged in any way while following the instructions. For SRT owners, feel free to use this guide as well. The basic steps are exactly the same and the only part that is different is the screws in the bottom front of the bumper. Also, the upper and lower grilles attach differently on the SRT models, but you'll be able to easily figure it out once you have the bumper off the car.
Getting Started:
It’s always recommended that you disconnect your battery, I chose not to, so it’s up to you. And you’ll need to pop your hood. Parts of this job are easier with two people, but I prefer to do all of my own stunts, so it can definitely be done solo. It will give you a bit more room to work if you put the front of your car on jack stands, but as you will see in the pictures, it can be done on the ground.
Tools:
1-2 Medium length Flat-Head Screwdrivers or a plastic substitute if you have it (trim tools have become my preferred tools for the pins)
10mm wrench, or I prefer a socket with a short extension and my trusty ratchet
7mm wrench or socket
Small tray, box, or bucket so you have a safe place to put your parts so they don’t get lost
A Phillip’s Head Screwdriver (crosshead) or I prefer my cordless screw gun
An old blanket or in my case a large piece of cardboard so you have a place to set the bumper down without damaging it.
Bumper Removal
![Image]()
Step 1: Remove the front covers
![Image]()
![Image]()
Fig. 1: Start with the Driver’s side first, the plastic is flexible and you can easily lift the corner at the center of the car. Pull up on the cover starting at the corner and working your way around to release the clips. It should come pretty easily.
Fig. 2 Driver’s side removed
Fig. 3 Repeat the process from figure one and remove the passenger side cover. The white arrow indicates the aforementioned clips in figure 1
Step 2: Remove the push-pins that hold the top of the bumper in place.
![Image]()
![Image]()
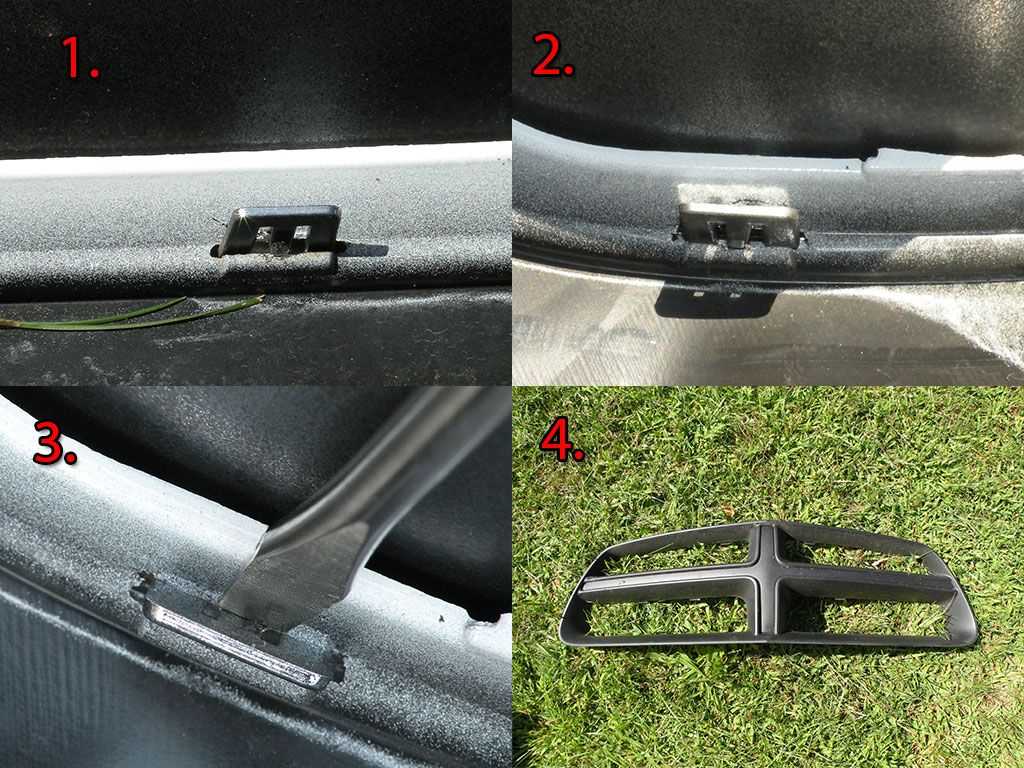
Fig. 1 Slide the tip of your flat-head screwdriver under the top section of the push-pin. If you look carefully you will find a slot for your screwdriver to slide into.
Fig. 2: Slide the screwdriver all the way in to the center and twist, this should start to pop the center of the pin up, continue this process around the top until the center pin is all the way up.
Fig. 3: After the center pin is up, slide you screwdriver under the bottom section.
Fig. 4: Repeat the process from figure 2 to remove the pin completely. Then repeat the process from figures 1-4 to remove the other three pins. Be sure to put the pins somewhere you will not lose them.
**Steps 3, 4, and 5 will be easier if you turn your wheels away from the side of the car you are working on, I started on the driver’s side.**
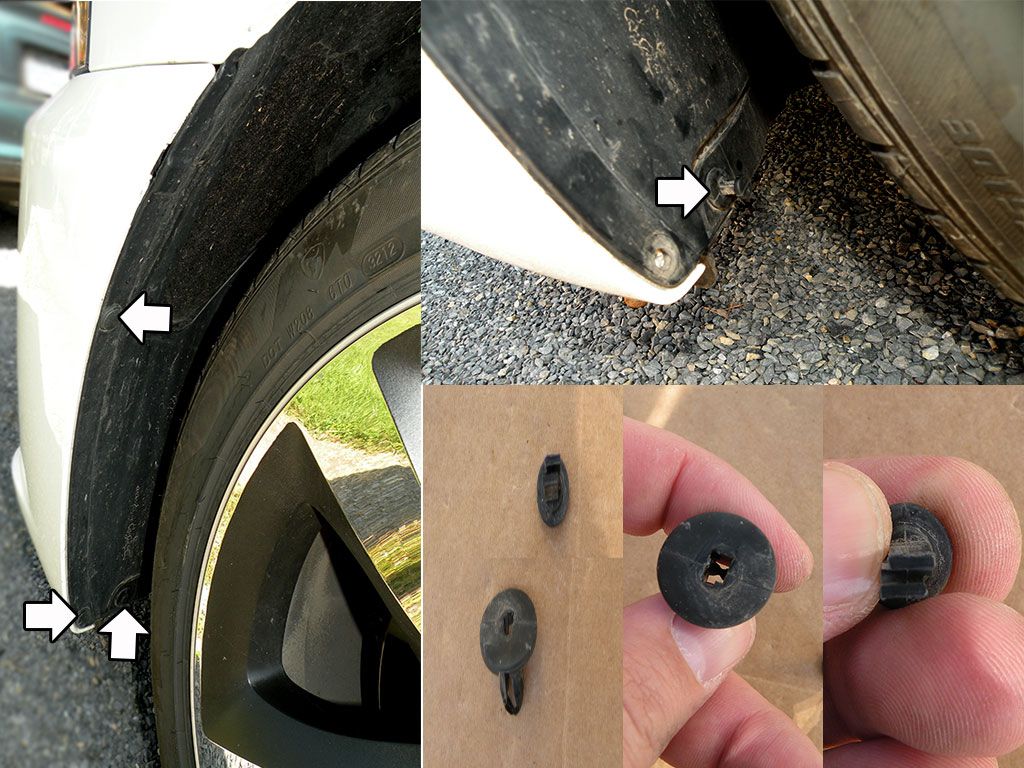
Step 3: Remove the push-pins on the inner fender
![Image]()
On both sides of the bumper there are 3 pins you will need to remove. For this, you will use the same process from Step 2. You will notice that the pin on the inside looks different but they work the same way. Do not be alarmed if these pins come apart, but they only go back together one way as you can see from the picture.
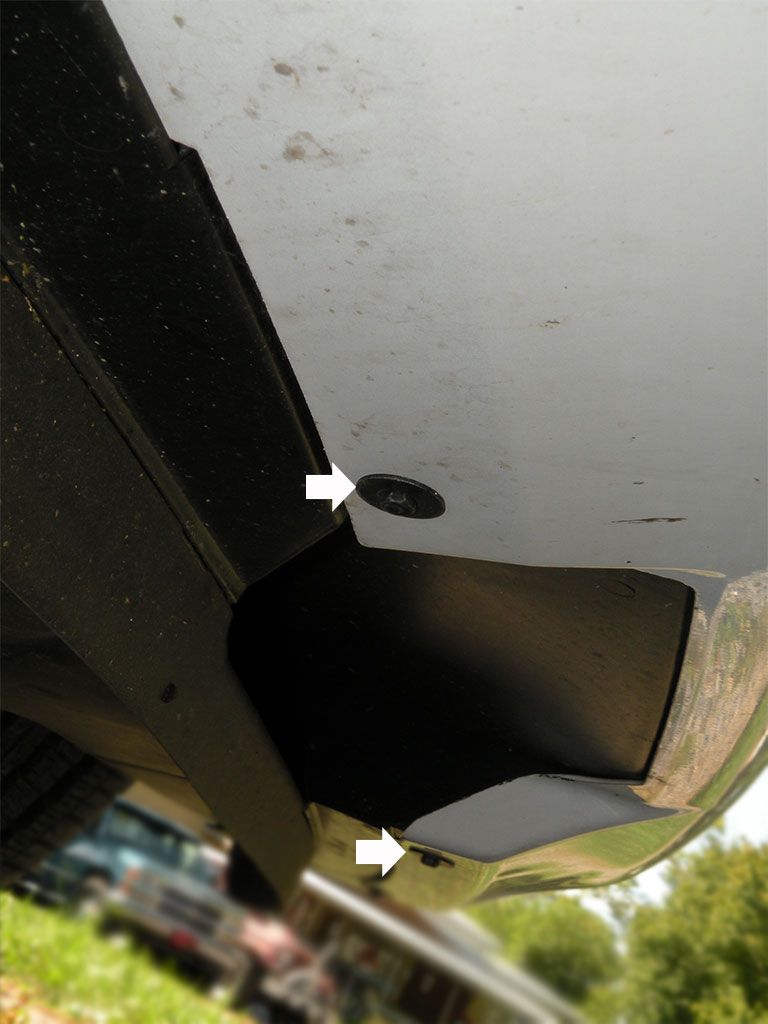
Step 4: Finding and exposing the bumper bracket screw
![Image]()
Fig. 1: Look for the raised spot on your inner fender (indicated by the white arrow), about 2 inches below the fender/bumper seam.
Fig. 2: Slide your screwdriver in between the plastic inner fender and the edge of the bumper. Be gentle so you do not damage your paint.
Fig. 3: Make sure you’ve slid the screwdriver in far enough that you can us the metal of the fender to pry against and pry the plastic inner fender away exposing the 10mm screw.
Step 5: Remove the Bumper Screw and pull the bumper away from the body
![Image]()
Fig. 1: While holding the inner fender back with you screwdriver, remove the 10 mm screw with your wrench or socket. (This is one of those places where and extra hand would be useful.)
Fig. 2: While still holding the inner fender away for you to see, slide your screwdriver into the notch indicated by the white arrow. Make sure it is between the bumper and the black plastic bracket underneath. Then pry the bumper away from the bracket.
Fig: 3: It may seem hard to pry the bumper away from the bracket if this is your first time removing it, but it will come and it should look like the picture in figure 3.
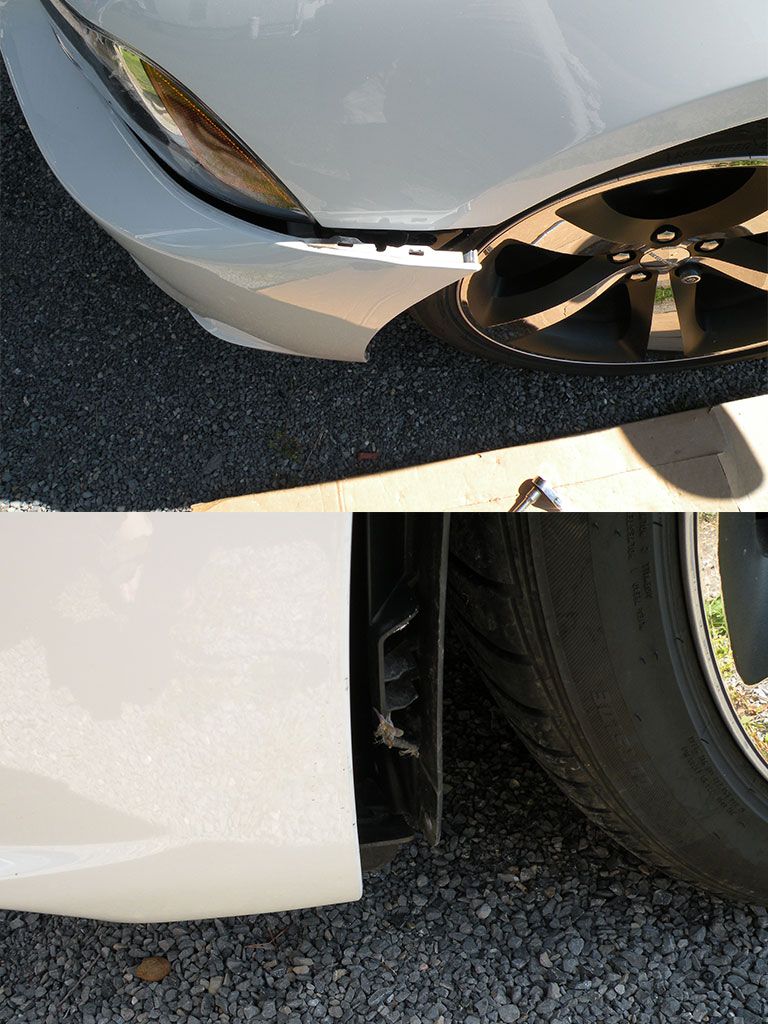
![Image]()
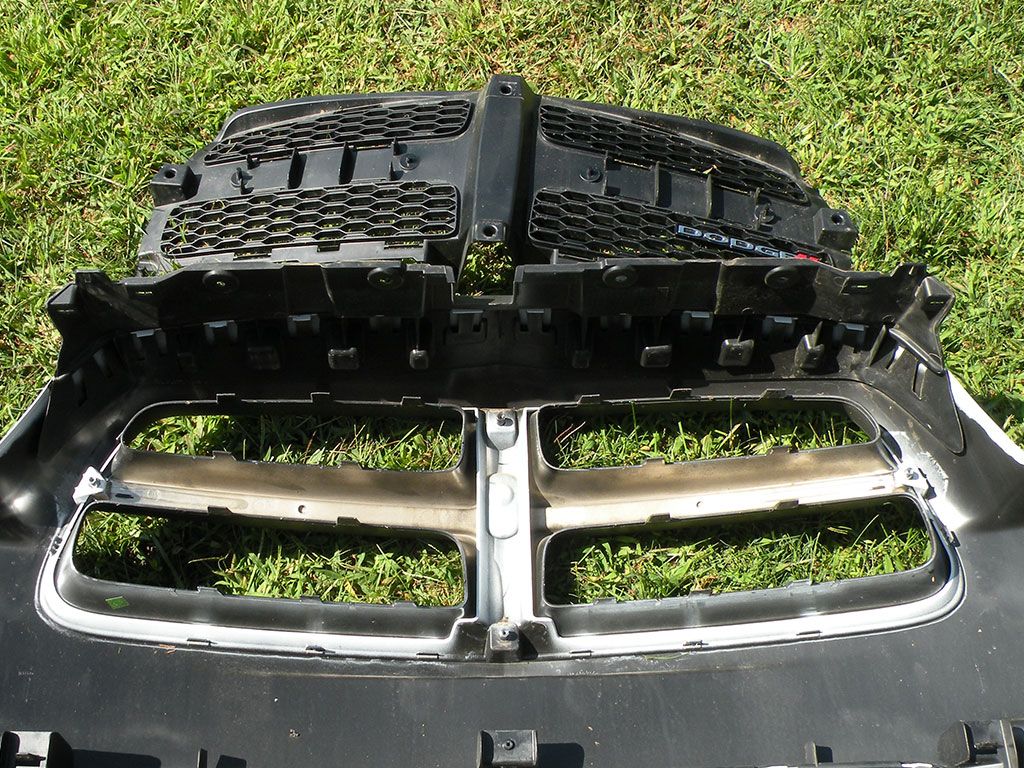
Top and side views of the bumper after it has been released from the bracket and the pins removed.
***Repeat steps 3, 4, and 5 for the passenger side of the car***
Step 6: Remove the screws in the bottom of the bumper
![Image]()
Using your 7mm wrench or socket, remove the 6 screws that hold the bottom of the bumper to the under-pan.
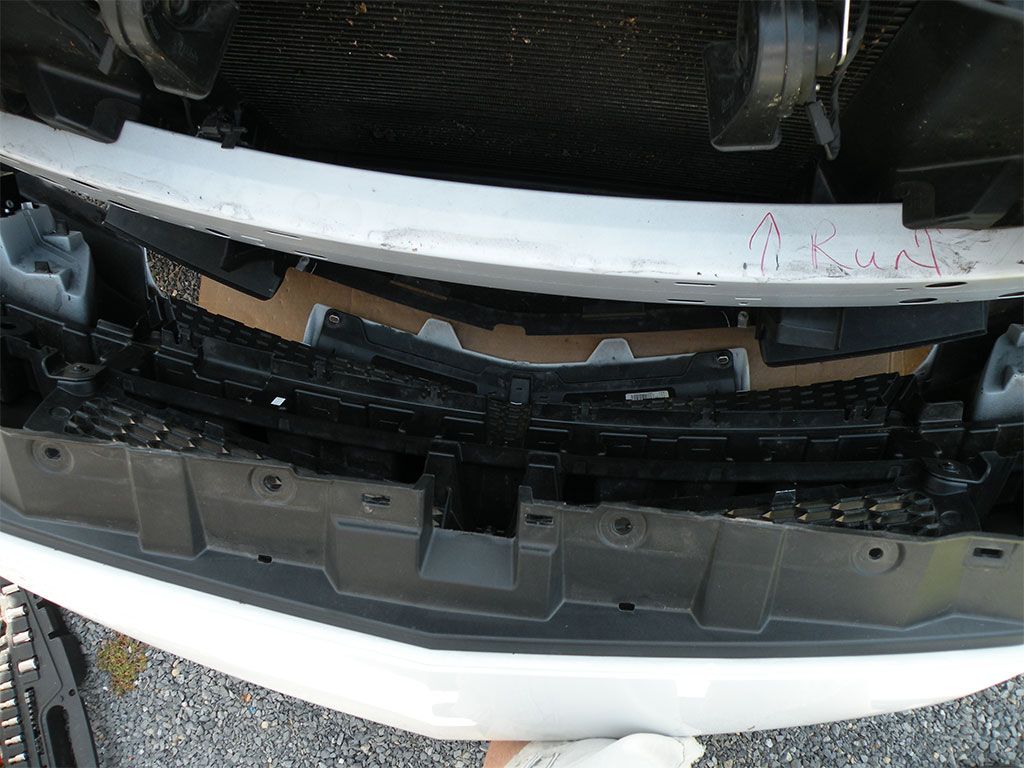
Step 7: Removing the bumper (make sure both sides are free of the bumper brackets on the fenders)
![Image]()
I have found that it’s easiest to grab the bumper in the top center (as shown in the picture) and lift up slightly and pull the bumper toward you. I keep it close to my body so I do not drop it. Pull it just far enough that you know it is completely free of the vehicle and you can set it down on you blanket or in my case the cardboard.
![Image]()
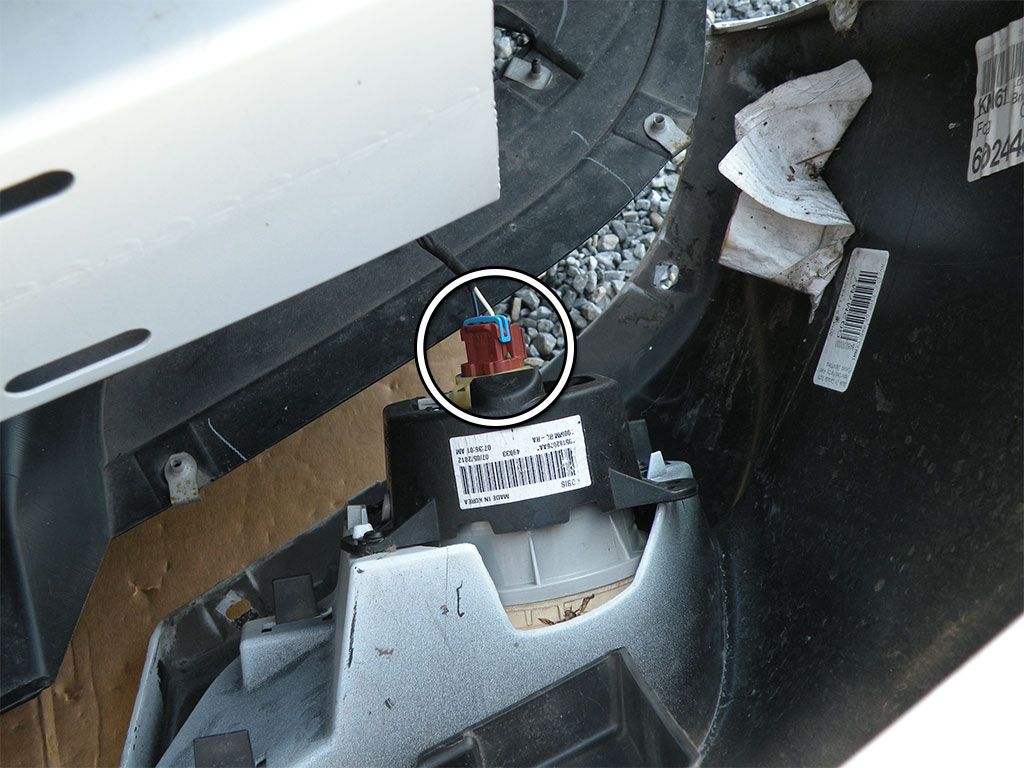
Step 8: Unplug your fog lights if you have them.
![Image]()
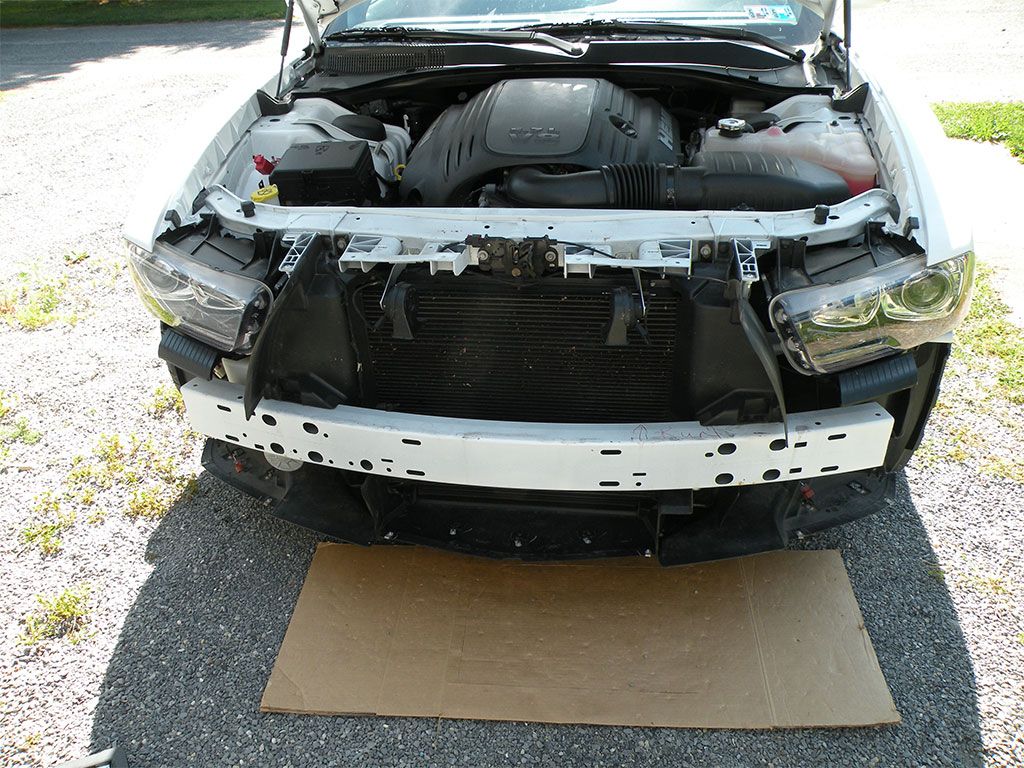
TADA! Bumper removed!
![Image]()
**The following steps are to remove the Grille from the bumper**
If you are not removing your grille, you can skip ahead to Step 12 for instructions on how to re-install your bumper.
Step 9: Remove the Inner Bumper (lay the bumper face down on your blanket or I chose my yard)
![Image]()
In order to remove the inner bumper, remove the 3 Phillip’s head screw and lift away from the bumper.
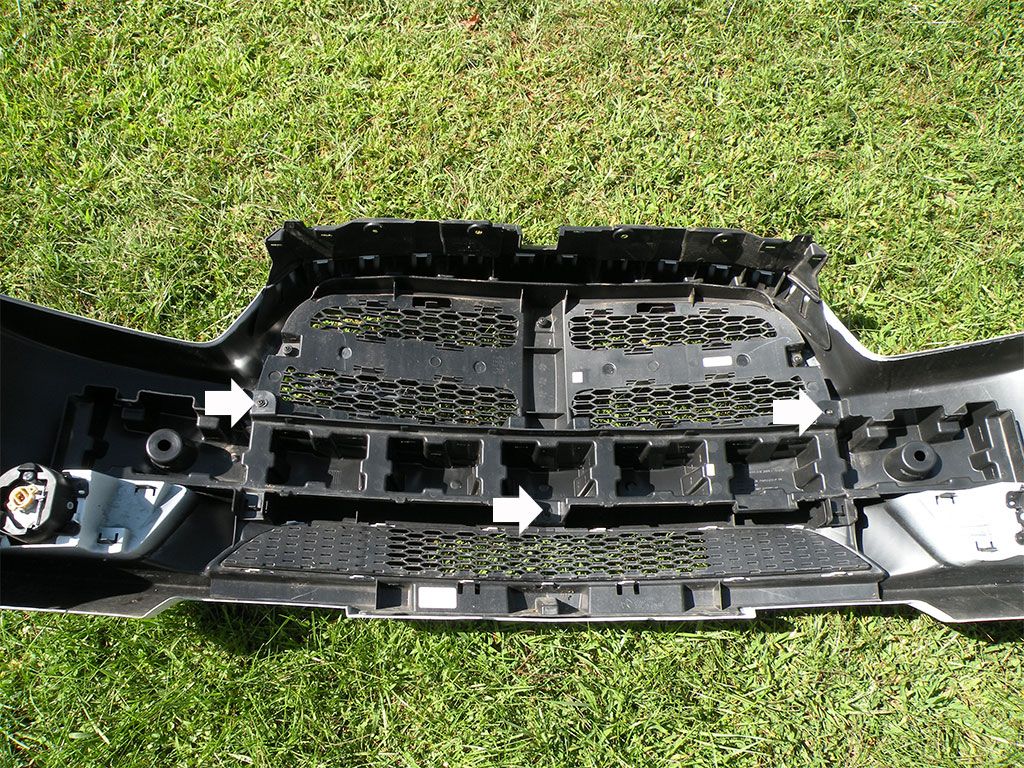
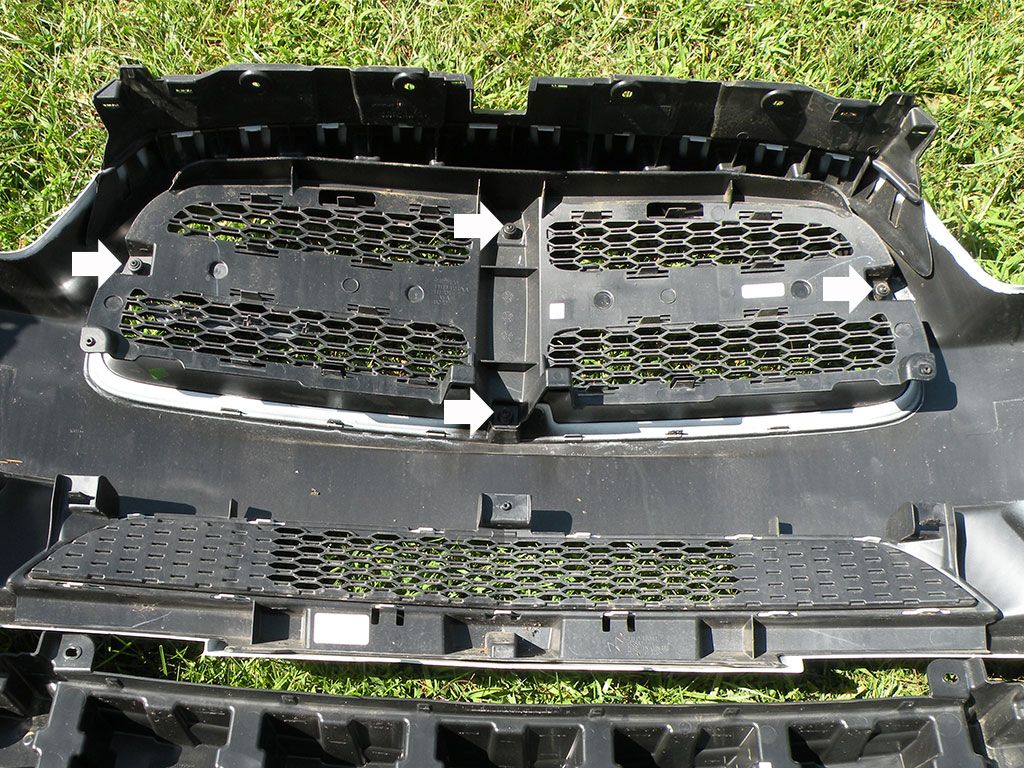
Step 10: Remove the Grille Honeycomb
![Image]()
First remove the 4 Phillip’s Head screws indicated by the white arrows.
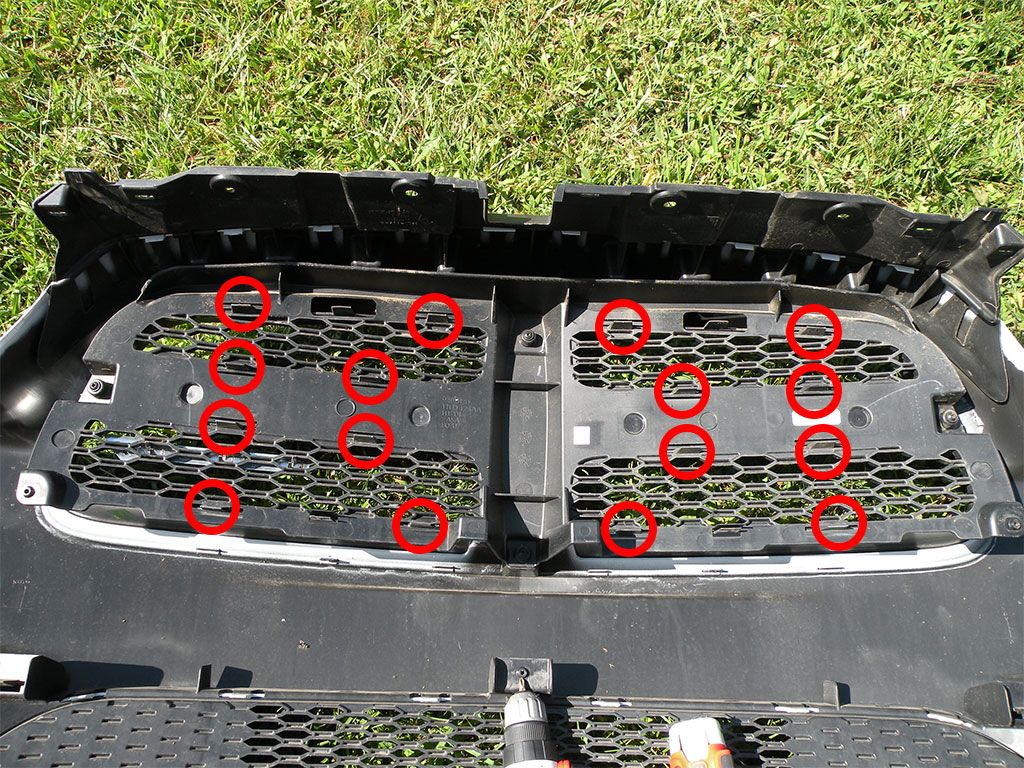
Next (one of the “fun parts”) is the clips that hold the honeycomb in place. These are indicated by the red circles, 16 total.
![Image]()
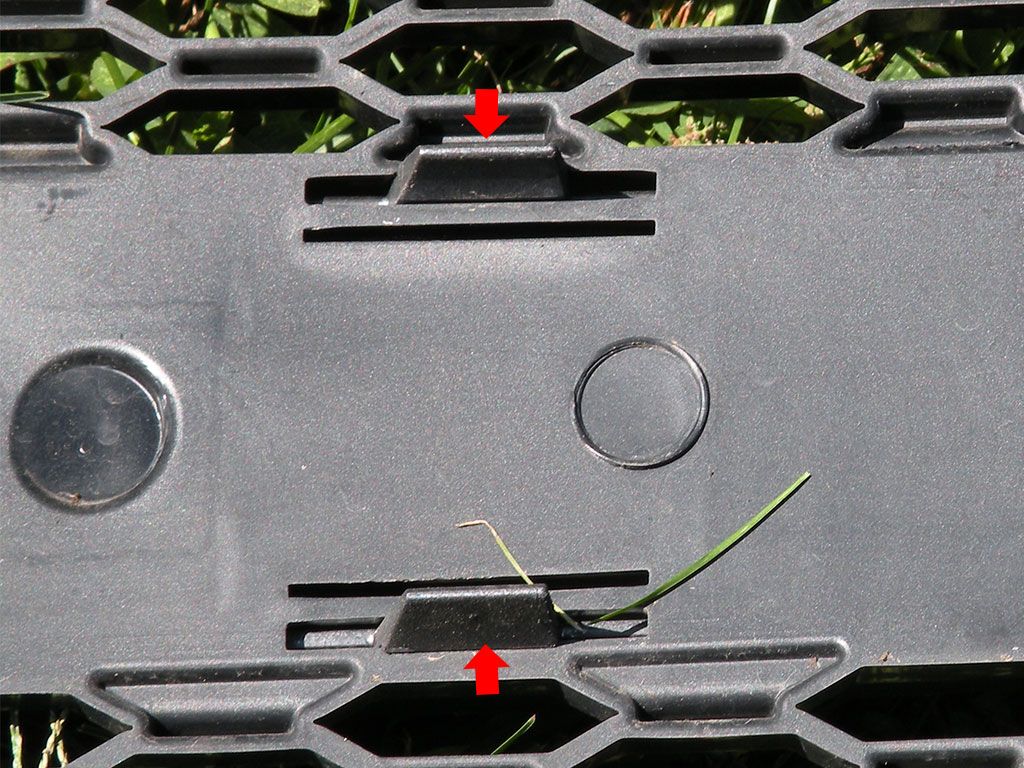
You’ll need you push these clips in and then down (or pull up on the honeycomb) to release the honeycomb from the grille surround.
![Image]()
Since I was doing this alone, I found it easier to start at a corner and carefully work my way around. This part can be challenging, so be sure you do not break clips.
![Image]()
When you’re done it’ll look something like this
![Image]()
Step 10: Removal of the Grille Surround
![Image]()
Figures 1 & 2 Show a close up of the clips that hold the grille surround in place. In figure 2 you can see the part of the clip that you need to press to make it release.
Fig. 3: Use your screwdriver to push in on the center of the clip until it passes the point where it holds, then push it down through the hole to release it completely. You may have to use your screwdriver on the back side of the clip as well to free it from the bumper. Repeat this process all the way around the grille surround until all of the clips are free, 16 total. I found it easier to start at a corner and work my way around. This can be tricky if you’re doing this by yourself because these clips tend to pop back in if you are not careful. Also, be sure not to break these clips off in the process.
GRILLE AND SURROUND REASSEMBLY
Step 11: Bumper reassembly; Grille Surround, Honeycomb and Inner Bumper
![Image]()
Fig. 1: Place your bumper face up (I have mine on a small table) and press your grille surround back into place making sure all of the clips line up with the holes in the bumper.
Fig. 2: Make sure all 16 of the Grille Surround clips are seated back into the bumper and locked in, then snap the honeycomb back in place from the back of the bumper. Be sure all 16 of the honeycomb clips are seated and locked in place. You will know when the clips are seated and locked because they will make a pop sound.
Fig. 3: Replace the 4 Phillip’s Head screws (blue arrows) that hold the Honeycomb in place.
Fig. 4: Slide the inner bumper into place and replace the 3 Phillip’s Head screws (blue arrows) that hold it in place.
BUMPER INSTALLATION
Step 12: Re-installing the Bumper
![Image]()
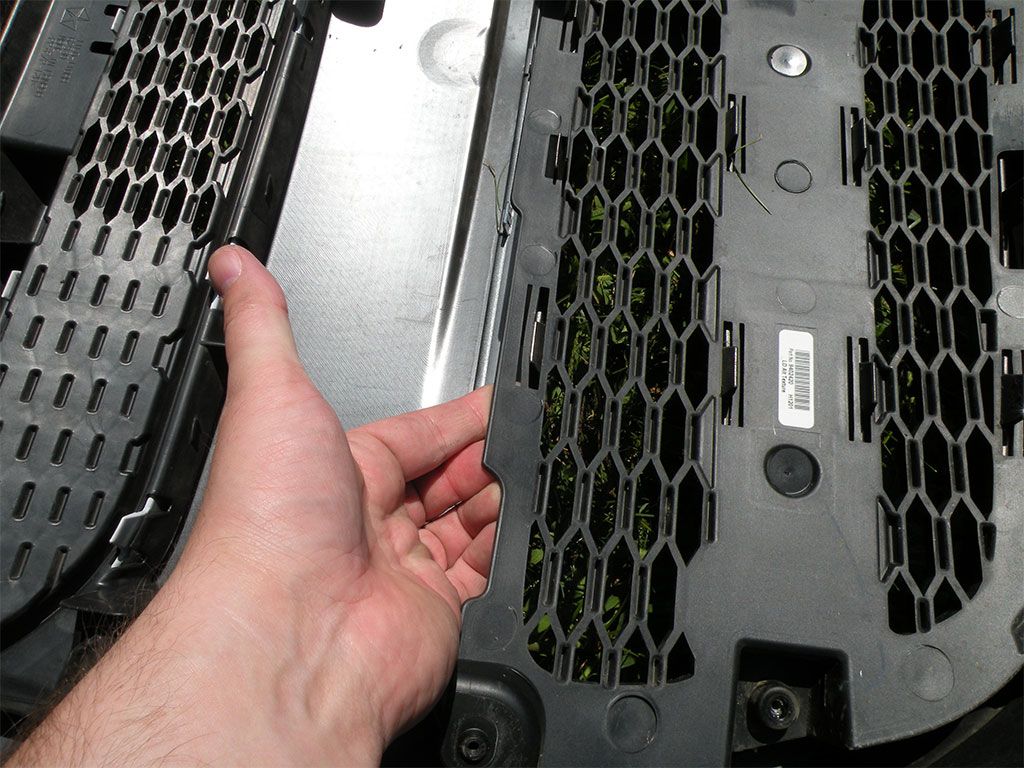
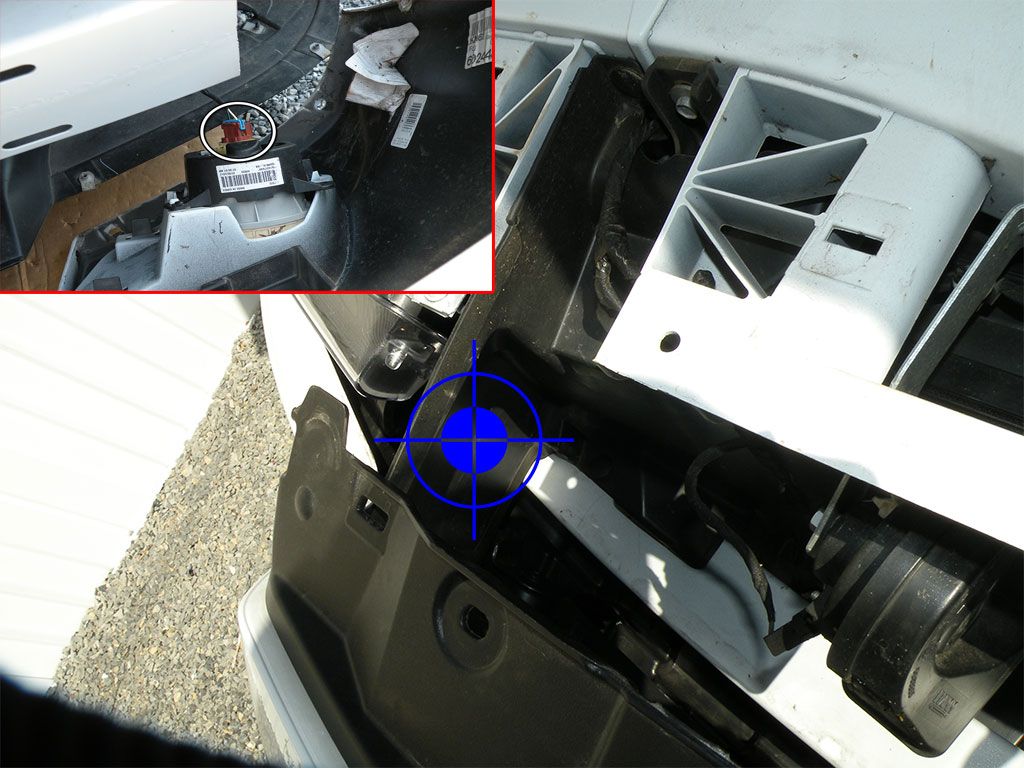
Place the bumper on the ground (on the blanket) in front of the car and don’t forget to reconnect your fog light plugs. Then grab the bumper from the top center and lift it up to the front of the car. Slide the bumper into place making sure the air channel flaps (indicated by the blue bull’s-eye) slide in between the Grille and the outer shell of the bumper.
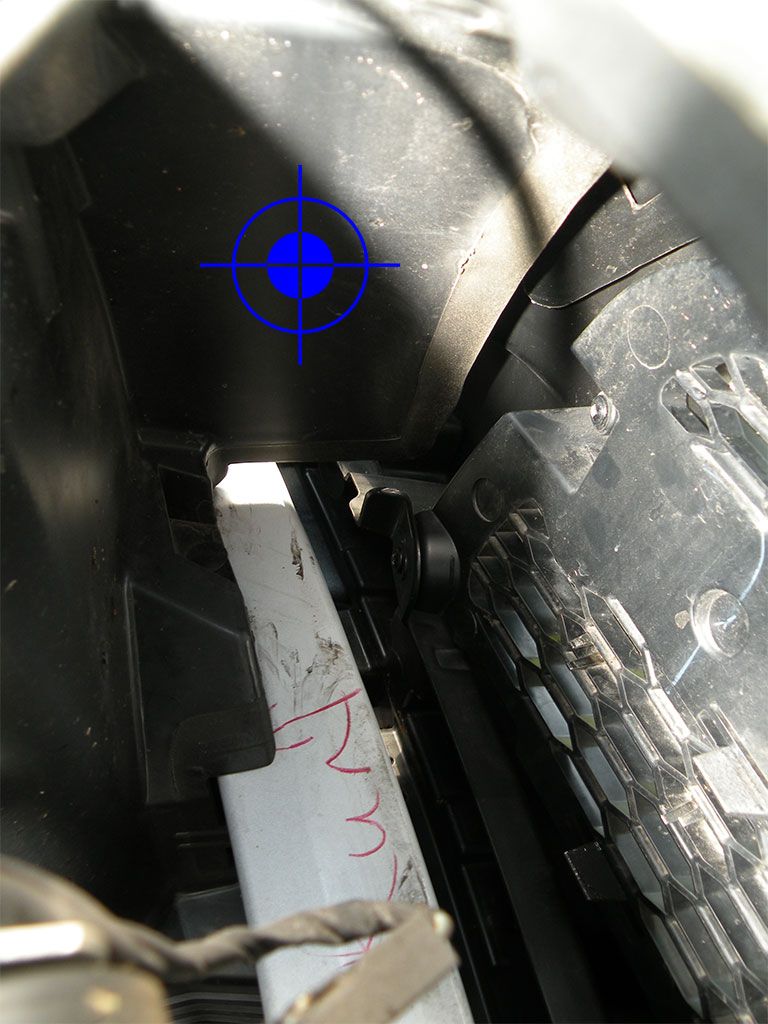
Here’s another view of the air channel flap (indicated by the blue bull’s-eye) and where it needs to go.
![Image]()
Step 13: Reattaching the Bumper to the car
![Image]()
Fig. 1: I put 2 of the push-pins in the top of the bumper to help hold it in place and keep it from falling off the car as I work on other areas.
Fig. 2: Line up the corner of the bumper with the bumper bracket and firmly push it into place, it will make a pop sound to let you know it’s locked in. Then use your screwdriver to pry back the inner fender and replace the 10mm screw that holds the bumper to the bracket.
Fig. 3: Make sure the bottom of the bumper is lined up with the inner fender and everything is back in place, and flush.
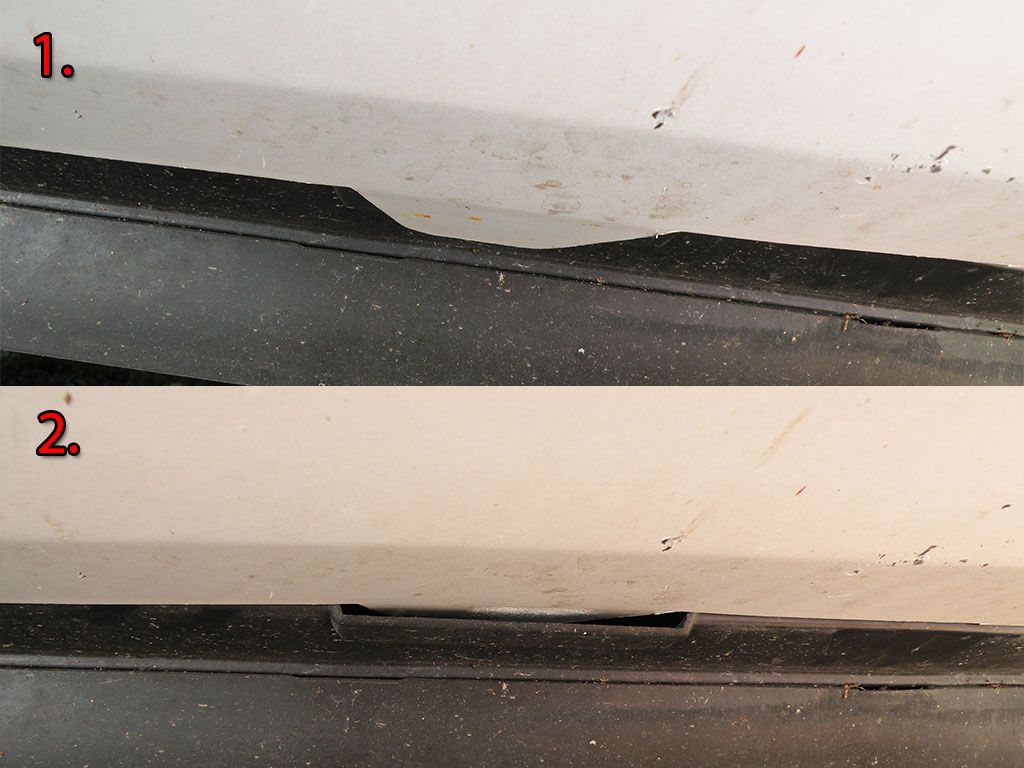
Step 14: Seating the lower tabs on the bumper
![Image]()
You will notice 2 large tabs on the bottom of the front bumper. These tabs need to slide into the slots of the under pan as shown in Figures 1 & 2.
Step 15: Replacing the fasteners
![Image]()
Fig. 1: Using a 7mm wrench or socket replace the 6 screws that hold the bottom of the bumper to the under-pan.
Fig. 2: Replace the push-pins on the inner fenders and do not forget to put the odd one on the bottom inside. Don’t forget to do this on both sides of the car
Fig. 3: Replace the remaining push-pins in the top of the bumper near the engine bay (indicated by the blue arrows).
Step 16: Replace the covers
![Image]()
Fig. 1: Replace the passenger side cover first.
Fig. 2: Then replace the driver’s side cover.
Fig. 3: Close the hood and reconnect your battery if you chose to disconnect it. Clean up and call it a day!
This project was performed on my 2013 Dodge Charger R/T. These instructions are a recollection of my experience and the process I used on my own vehicle. Follow these instructions AT YOUR OWN RISK, I will accept NO RESPONSIBILITY if your car is damaged in any way while following the instructions. For SRT owners, feel free to use this guide as well. The basic steps are exactly the same and the only part that is different is the screws in the bottom front of the bumper. Also, the upper and lower grilles attach differently on the SRT models, but you'll be able to easily figure it out once you have the bumper off the car.
Getting Started:
It’s always recommended that you disconnect your battery, I chose not to, so it’s up to you. And you’ll need to pop your hood. Parts of this job are easier with two people, but I prefer to do all of my own stunts, so it can definitely be done solo. It will give you a bit more room to work if you put the front of your car on jack stands, but as you will see in the pictures, it can be done on the ground.
Tools:
1-2 Medium length Flat-Head Screwdrivers or a plastic substitute if you have it (trim tools have become my preferred tools for the pins)
10mm wrench, or I prefer a socket with a short extension and my trusty ratchet
7mm wrench or socket
Small tray, box, or bucket so you have a safe place to put your parts so they don’t get lost
A Phillip’s Head Screwdriver (crosshead) or I prefer my cordless screw gun
An old blanket or in my case a large piece of cardboard so you have a place to set the bumper down without damaging it.
Bumper Removal

Step 1: Remove the front covers
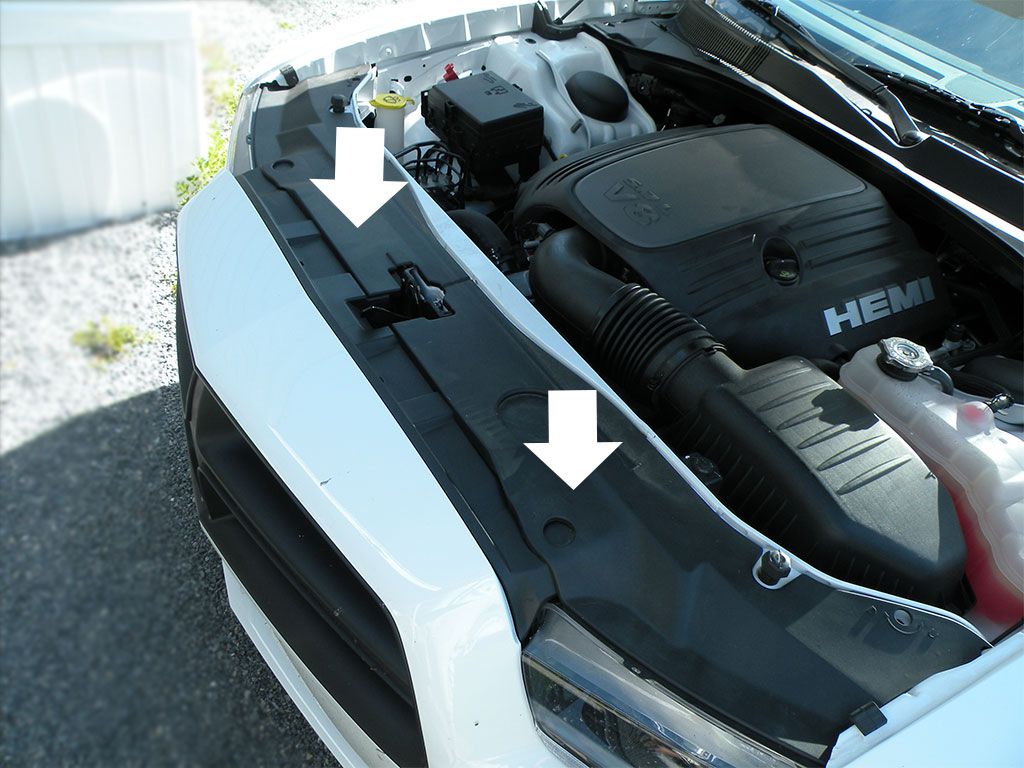
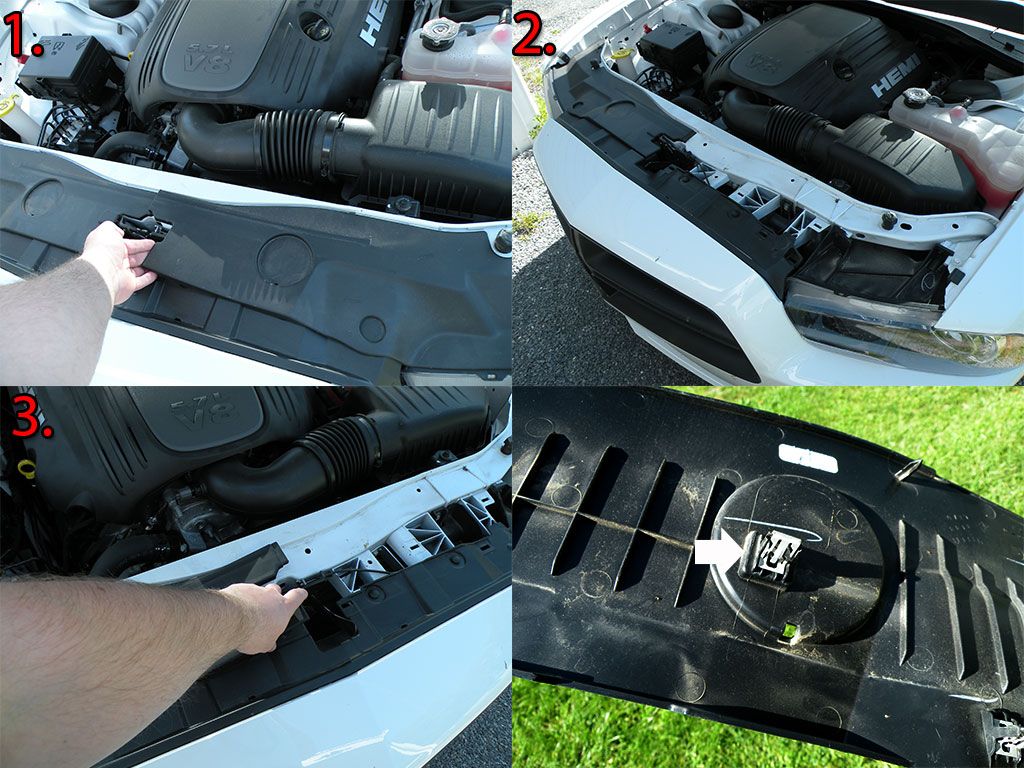
Fig. 1: Start with the Driver’s side first, the plastic is flexible and you can easily lift the corner at the center of the car. Pull up on the cover starting at the corner and working your way around to release the clips. It should come pretty easily.
Fig. 2 Driver’s side removed
Fig. 3 Repeat the process from figure one and remove the passenger side cover. The white arrow indicates the aforementioned clips in figure 1
Step 2: Remove the push-pins that hold the top of the bumper in place.
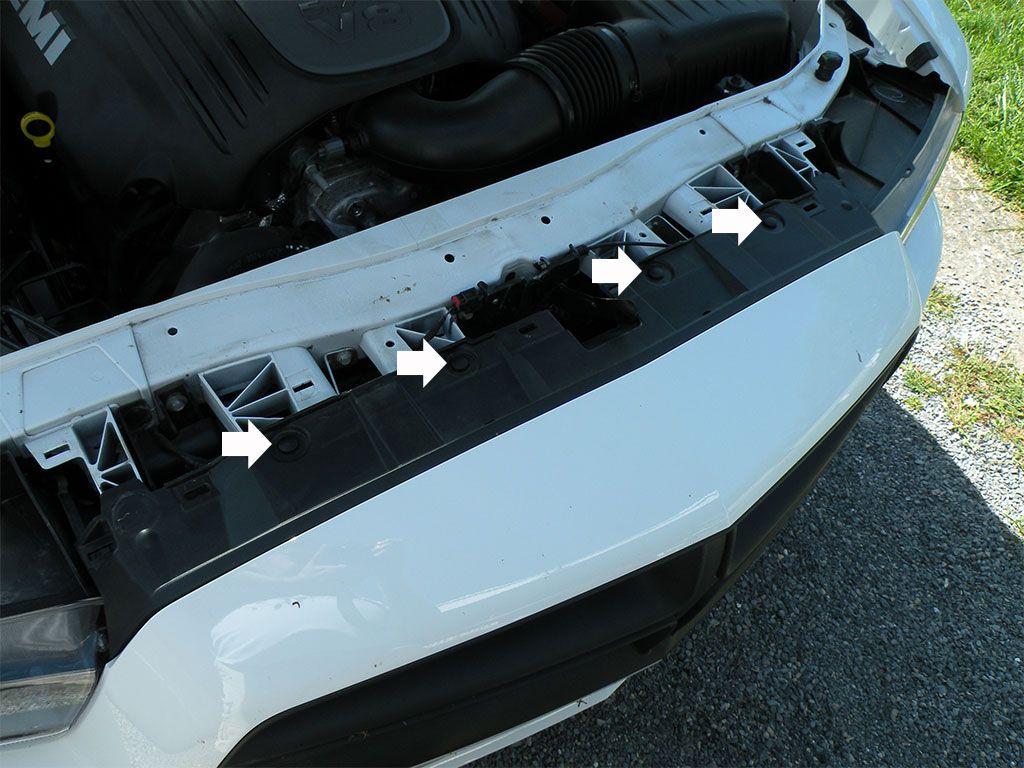
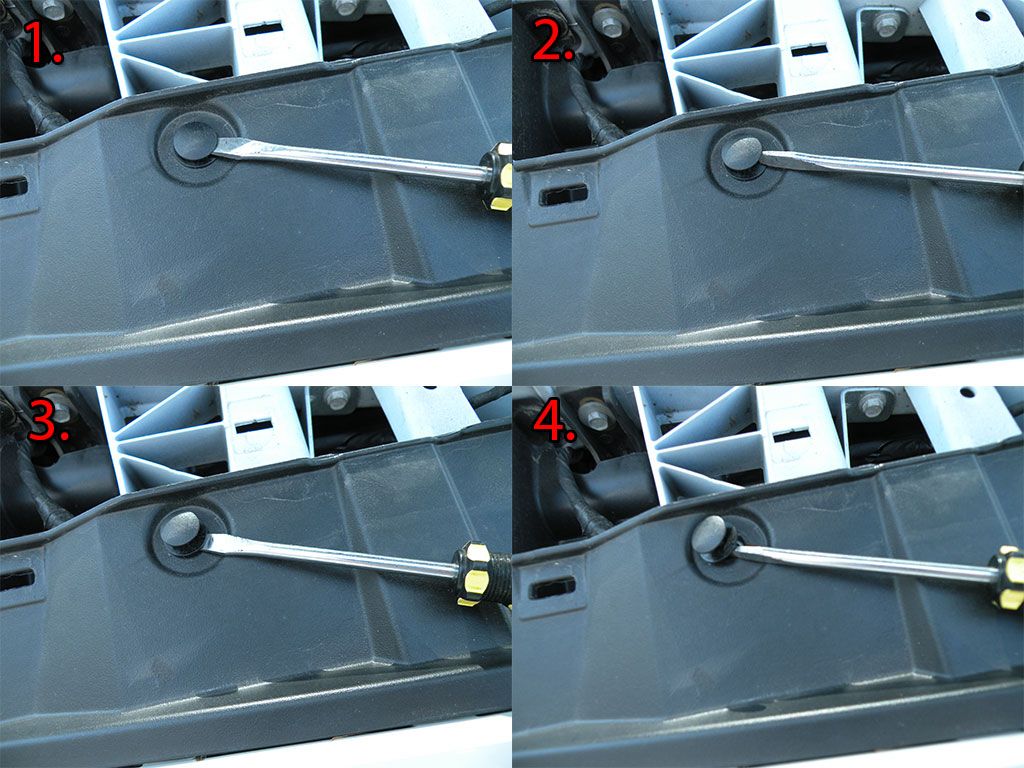
Fig. 1 Slide the tip of your flat-head screwdriver under the top section of the push-pin. If you look carefully you will find a slot for your screwdriver to slide into.
Fig. 2: Slide the screwdriver all the way in to the center and twist, this should start to pop the center of the pin up, continue this process around the top until the center pin is all the way up.
Fig. 3: After the center pin is up, slide you screwdriver under the bottom section.
Fig. 4: Repeat the process from figure 2 to remove the pin completely. Then repeat the process from figures 1-4 to remove the other three pins. Be sure to put the pins somewhere you will not lose them.
**Steps 3, 4, and 5 will be easier if you turn your wheels away from the side of the car you are working on, I started on the driver’s side.**
Step 3: Remove the push-pins on the inner fender
On both sides of the bumper there are 3 pins you will need to remove. For this, you will use the same process from Step 2. You will notice that the pin on the inside looks different but they work the same way. Do not be alarmed if these pins come apart, but they only go back together one way as you can see from the picture.
Step 4: Finding and exposing the bumper bracket screw
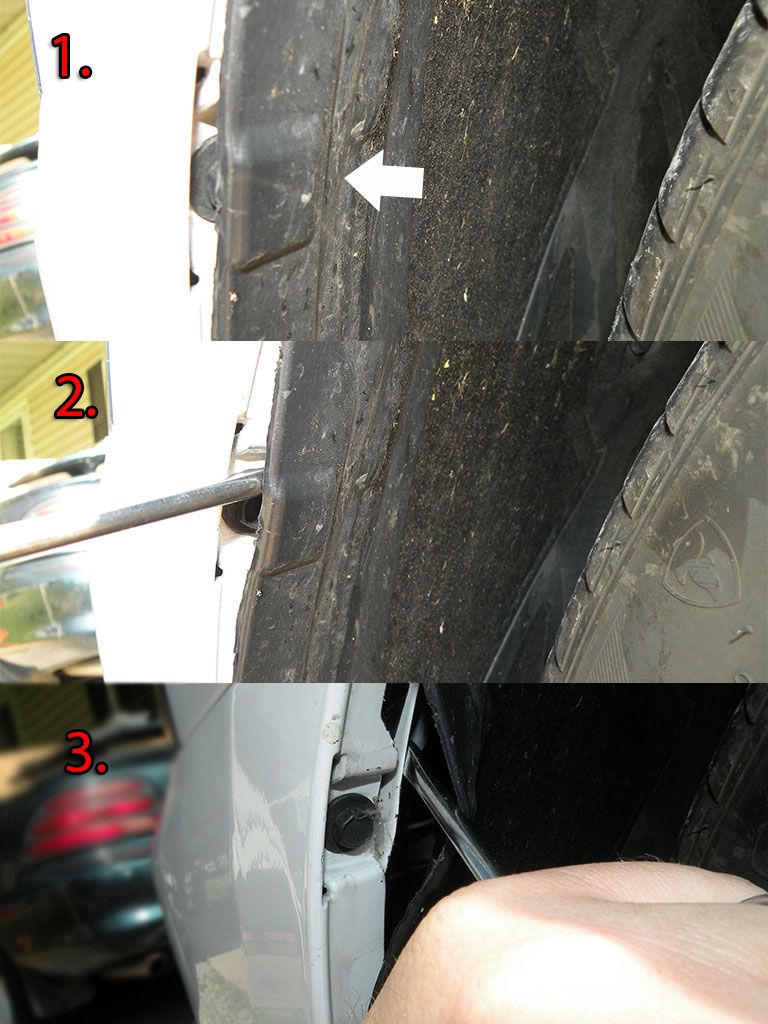
Fig. 1: Look for the raised spot on your inner fender (indicated by the white arrow), about 2 inches below the fender/bumper seam.
Fig. 2: Slide your screwdriver in between the plastic inner fender and the edge of the bumper. Be gentle so you do not damage your paint.
Fig. 3: Make sure you’ve slid the screwdriver in far enough that you can us the metal of the fender to pry against and pry the plastic inner fender away exposing the 10mm screw.
Step 5: Remove the Bumper Screw and pull the bumper away from the body
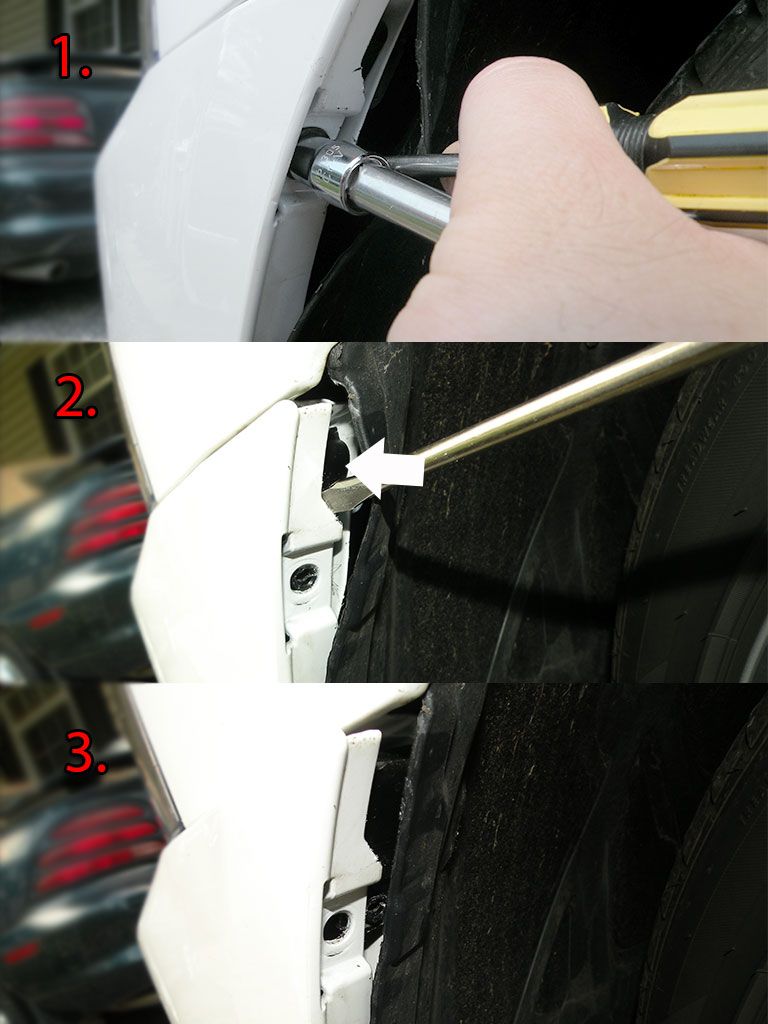
Fig. 1: While holding the inner fender back with you screwdriver, remove the 10 mm screw with your wrench or socket. (This is one of those places where and extra hand would be useful.)
Fig. 2: While still holding the inner fender away for you to see, slide your screwdriver into the notch indicated by the white arrow. Make sure it is between the bumper and the black plastic bracket underneath. Then pry the bumper away from the bracket.
Fig: 3: It may seem hard to pry the bumper away from the bracket if this is your first time removing it, but it will come and it should look like the picture in figure 3.
Top and side views of the bumper after it has been released from the bracket and the pins removed.
***Repeat steps 3, 4, and 5 for the passenger side of the car***
Step 6: Remove the screws in the bottom of the bumper
Using your 7mm wrench or socket, remove the 6 screws that hold the bottom of the bumper to the under-pan.
Step 7: Removing the bumper (make sure both sides are free of the bumper brackets on the fenders)

I have found that it’s easiest to grab the bumper in the top center (as shown in the picture) and lift up slightly and pull the bumper toward you. I keep it close to my body so I do not drop it. Pull it just far enough that you know it is completely free of the vehicle and you can set it down on you blanket or in my case the cardboard.
Step 8: Unplug your fog lights if you have them.
TADA! Bumper removed!
**The following steps are to remove the Grille from the bumper**
If you are not removing your grille, you can skip ahead to Step 12 for instructions on how to re-install your bumper.
Step 9: Remove the Inner Bumper (lay the bumper face down on your blanket or I chose my yard)
In order to remove the inner bumper, remove the 3 Phillip’s head screw and lift away from the bumper.
Step 10: Remove the Grille Honeycomb
First remove the 4 Phillip’s Head screws indicated by the white arrows.
Next (one of the “fun parts”) is the clips that hold the honeycomb in place. These are indicated by the red circles, 16 total.
You’ll need you push these clips in and then down (or pull up on the honeycomb) to release the honeycomb from the grille surround.
Since I was doing this alone, I found it easier to start at a corner and carefully work my way around. This part can be challenging, so be sure you do not break clips.
When you’re done it’ll look something like this
Step 10: Removal of the Grille Surround
Figures 1 & 2 Show a close up of the clips that hold the grille surround in place. In figure 2 you can see the part of the clip that you need to press to make it release.
Fig. 3: Use your screwdriver to push in on the center of the clip until it passes the point where it holds, then push it down through the hole to release it completely. You may have to use your screwdriver on the back side of the clip as well to free it from the bumper. Repeat this process all the way around the grille surround until all of the clips are free, 16 total. I found it easier to start at a corner and work my way around. This can be tricky if you’re doing this by yourself because these clips tend to pop back in if you are not careful. Also, be sure not to break these clips off in the process.
GRILLE AND SURROUND REASSEMBLY
Step 11: Bumper reassembly; Grille Surround, Honeycomb and Inner Bumper
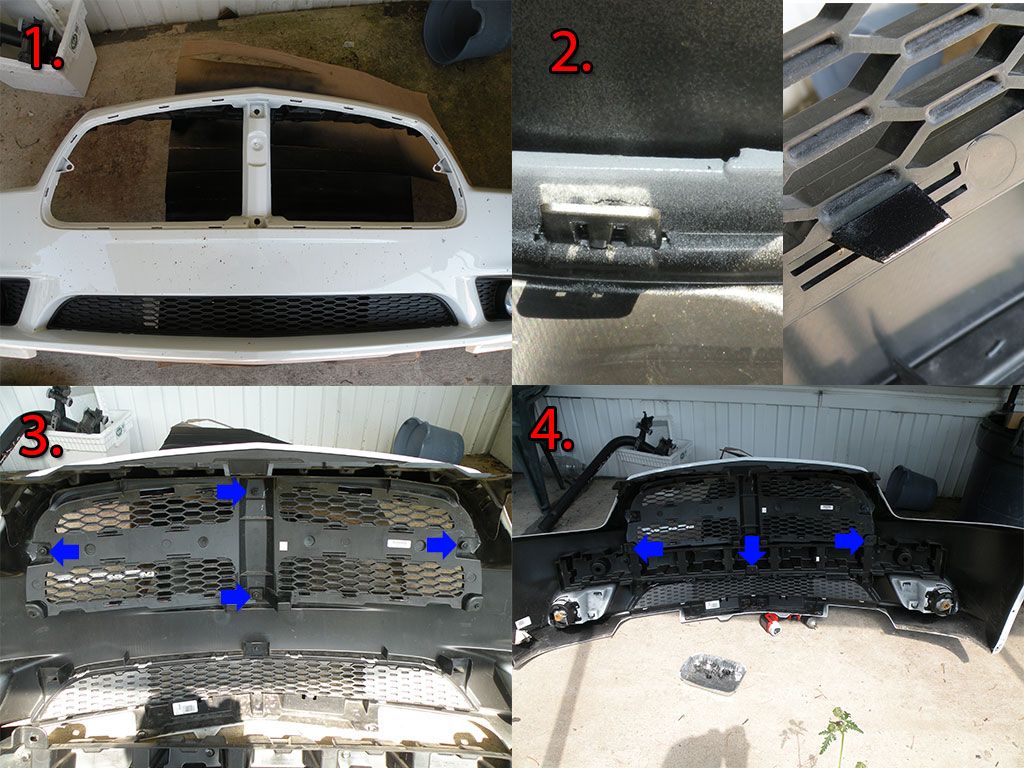
Fig. 1: Place your bumper face up (I have mine on a small table) and press your grille surround back into place making sure all of the clips line up with the holes in the bumper.
Fig. 2: Make sure all 16 of the Grille Surround clips are seated back into the bumper and locked in, then snap the honeycomb back in place from the back of the bumper. Be sure all 16 of the honeycomb clips are seated and locked in place. You will know when the clips are seated and locked because they will make a pop sound.
Fig. 3: Replace the 4 Phillip’s Head screws (blue arrows) that hold the Honeycomb in place.
Fig. 4: Slide the inner bumper into place and replace the 3 Phillip’s Head screws (blue arrows) that hold it in place.
BUMPER INSTALLATION
Step 12: Re-installing the Bumper
Place the bumper on the ground (on the blanket) in front of the car and don’t forget to reconnect your fog light plugs. Then grab the bumper from the top center and lift it up to the front of the car. Slide the bumper into place making sure the air channel flaps (indicated by the blue bull’s-eye) slide in between the Grille and the outer shell of the bumper.
Here’s another view of the air channel flap (indicated by the blue bull’s-eye) and where it needs to go.
Step 13: Reattaching the Bumper to the car
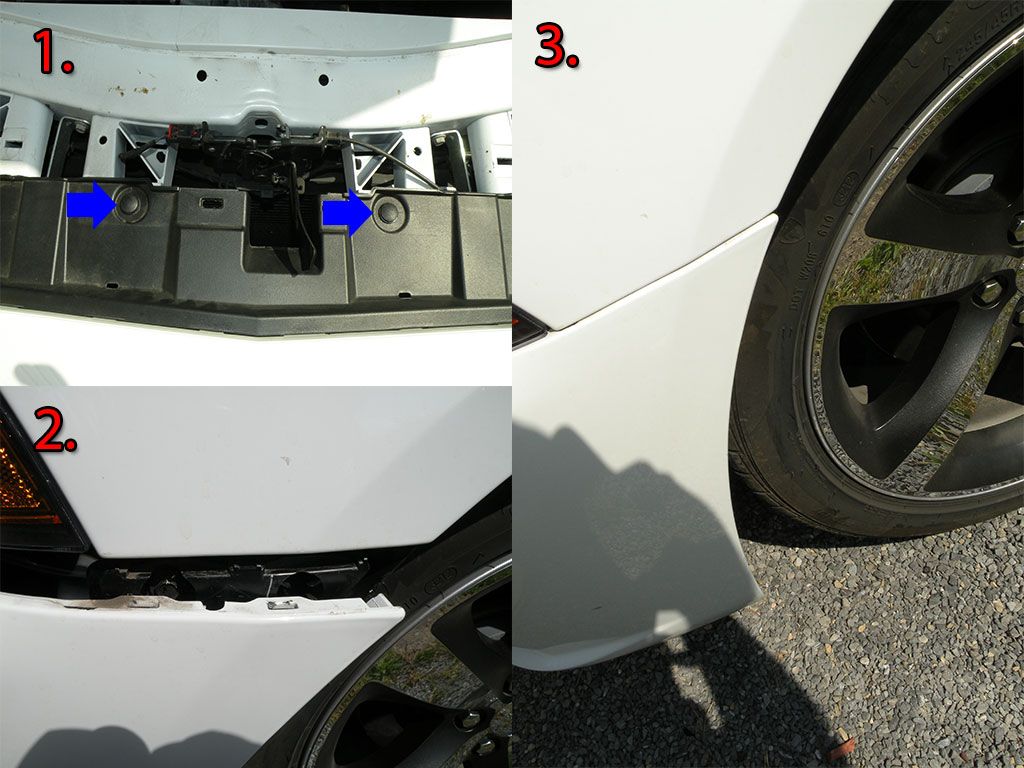
Fig. 1: I put 2 of the push-pins in the top of the bumper to help hold it in place and keep it from falling off the car as I work on other areas.
Fig. 2: Line up the corner of the bumper with the bumper bracket and firmly push it into place, it will make a pop sound to let you know it’s locked in. Then use your screwdriver to pry back the inner fender and replace the 10mm screw that holds the bumper to the bracket.
Fig. 3: Make sure the bottom of the bumper is lined up with the inner fender and everything is back in place, and flush.
Step 14: Seating the lower tabs on the bumper
You will notice 2 large tabs on the bottom of the front bumper. These tabs need to slide into the slots of the under pan as shown in Figures 1 & 2.
Step 15: Replacing the fasteners
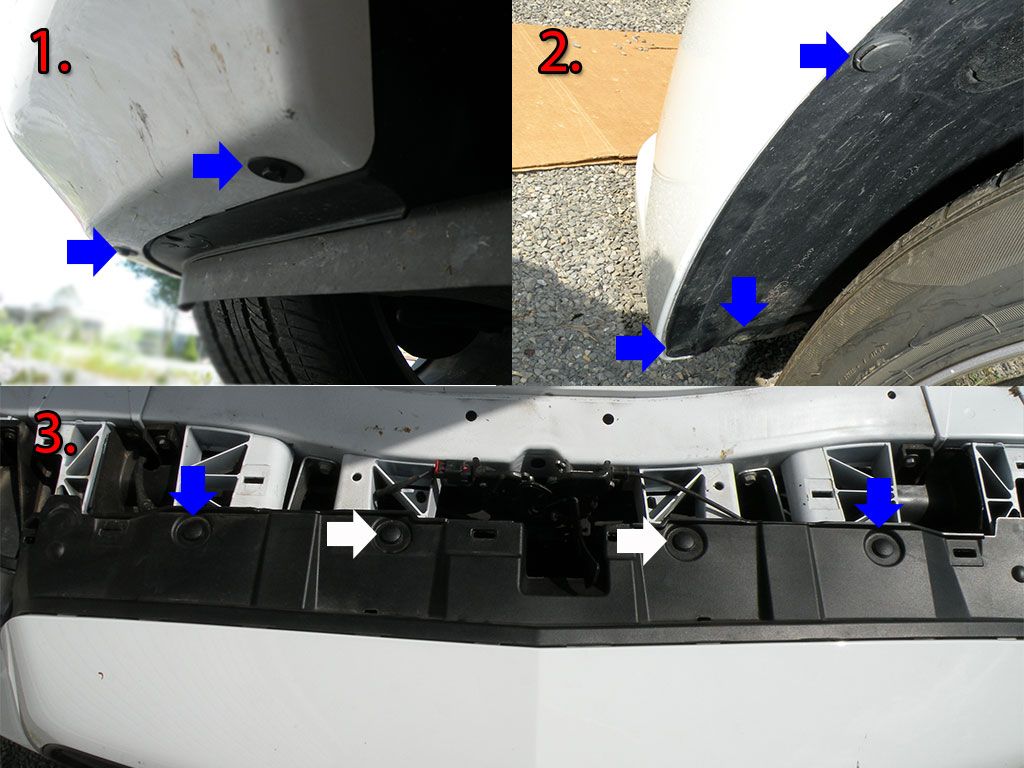
Fig. 1: Using a 7mm wrench or socket replace the 6 screws that hold the bottom of the bumper to the under-pan.
Fig. 2: Replace the push-pins on the inner fenders and do not forget to put the odd one on the bottom inside. Don’t forget to do this on both sides of the car
Fig. 3: Replace the remaining push-pins in the top of the bumper near the engine bay (indicated by the blue arrows).
Step 16: Replace the covers
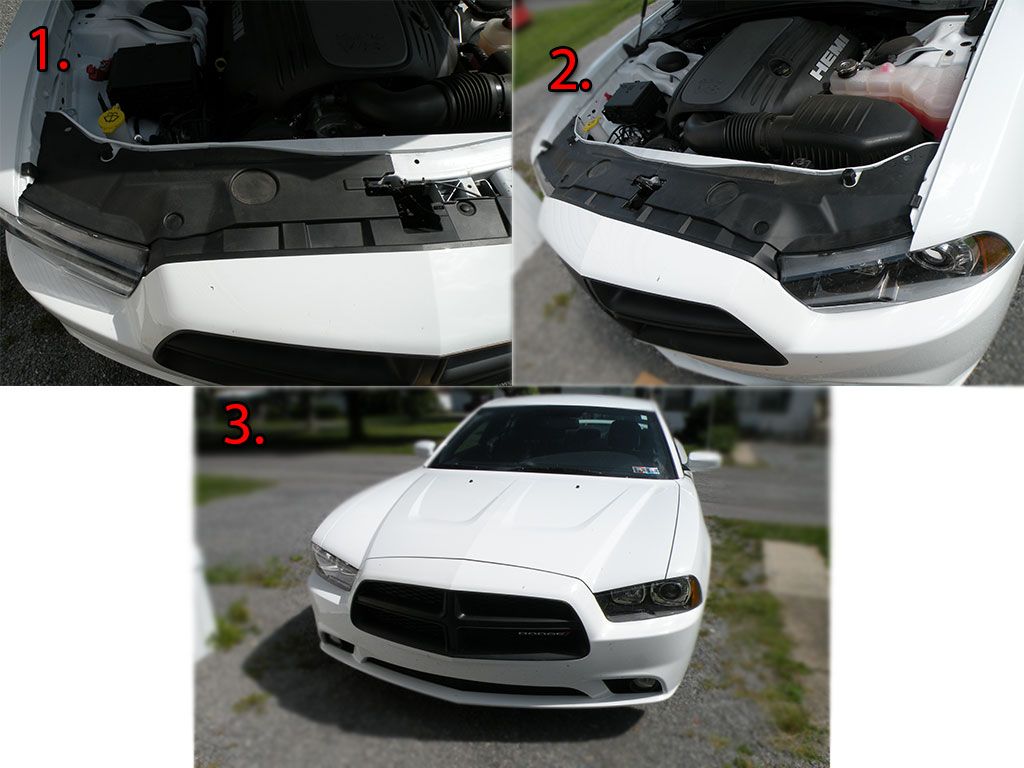
Fig. 1: Replace the passenger side cover first.
Fig. 2: Then replace the driver’s side cover.
Fig. 3: Close the hood and reconnect your battery if you chose to disconnect it. Clean up and call it a day!


