I made a post a few weeks ago regarding what has to either be a messed up A/C actuator or blend door in my 07 charger with dual climate control and after much research I am still super confused.
Recap of what the car was doing:
For a month or so, there would be a rapid clicking / knocking sound in the dash anytime I would adjust either temp knob on the dual climate control from its current position. This sound would last for 4-7 seconds and go away, but the Air would work fine. If I just left it in whatever setting it was on next time i started the car and never touched it, no sound.
As of a few weeks ago:
No more knocking sound at all when I adjust the temp, and the drivers side temp knob does not change anything but the passenger side adjusts accordingly with the knob. Drivers side blows very warm and weaker then the passenger side, which blows correctly to the temp its set on and harder. The driver side will not adjust with the temp control no matter what setting its on, while the passenger side works perfect. The rear A/C vents seem to be blowing the same temp the drivers side does, which varies from warm to very warm.
I tried the process I read about where the ignition is turned to on, A/C off. depress / hold defrost button, turn the Air to high. My defrost light never blinks no matter what, but the air does go through a short series of very faint sounds like its doing something. For the first few minutes after doing this, the drivers side air will blow slightly cooler then before (but not cold) and gradually get warmer as a I drive ultimately getting warm again within 10 minutes, while the passenger side stays consistent on whatever I have the temp dial set to.
Am I doing the "re-cal process" wrong since I never get the blinking defrost light? On my dual climate control, I have the far right knob set to the dash vent only setting (all the way to the right, not the auto setting), and I am turning the far left knob (A/C power level) all the way to the right from off to high, while depressing the defrost button in the center.
I dont have much money to blow right now so I have to try to self diagnose this. Ultimately I would like to drop the car off at a place, pick it up working and be done with it but funds do not allow. How many actuators will I need to order if the entire left side of the car plus the rear blows the warm temp? Are all the actuators the same size / shape or are there different ones for front / back / left / etc? Will there be anything on the current actuator when I pull it out that will be a dead give away on if its the actuator that is the issue or the blend door itself?
Sorry for the big post, just trying to get this taken care of asap as I am going to be selling the car
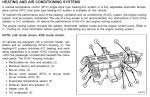
 and come as part of the entire HVAC box, which costs hundreds of dollars. Also, the diagram does not show the type of head on the screw. I'm stuck.