

I know there's already other threads like this, I just tried to make it easier to understand for others who feel nervous about doing the installation.
This is a step by step. I am not a professional installer, so I'm putting this up with many pictures in hopes of helping someone with their installation.
You will need the following, in order of use:
1. Camera
2. HID Kit (2 ballasts and 2 HID bulbs)
3. Wire cutters
4. Pliers
5. Zip ties
6. Relay Harness (see Step 7 for purchasing info). You only need one harness, not two. If you purchase your HID's from ebay seller HIDGate, you can tell him to include his anti-flicker capacitors for free and you will NOT need to buy the relay harness or the capacitor. Other sellers sell the anti-flicker kit as well. I suggest you contact them and ask if they have one for the Charger.
7. 470µF 35V capacitor (read Step 7 before buying, see Step 8 for purchasing info)
8. Electrical tape
9. TORX #20 driver
Level of difficulty: Beginner
The installation will take an average of about 1 hour to 1.5 hours without being rushed.
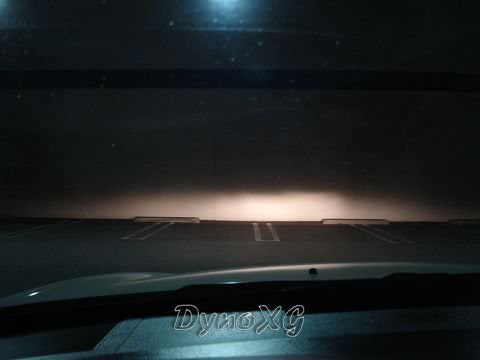
STEP 1:
Find a wall at night time and take a picture of your stock lighting against a wall. Remember the distance and place, so you can come back when you're done to adjust your HID's.
![Image]()
STEP 2:
You will receive two ballasts and two bulbs. Here's a picture of one of the bulbs.
![Image]()
Cut the grommet off, but be very careful not to cut the wires.
![Image]()
You will be left with just the bulb and the two wires. You will not be using the grommet or the other wires that were removed.
![Image]()
At this point in time, you may want to jump to Step 7-9 and complete those first before you continue to STEP 3.
STEP 3:
On an SXT, disconnect the tube with the arrow by just pulling it off and remove the screw the other arrow is pointing to.
![Image]()
![Image]()
Step 4:
Pull up the filter box carefully, but with a bit of force and set it aside.
![Image]()
Step 5:
*EDIT*
Before you continue with step five, read this thread by NBx33. It may save you from getting a headache. Thanks NBx33:
http://www.chargerforums.com/forums/showthread.php?t=113735
You may not have to do this step if the bulbs in your kit fit the housing correctly. Remove the original bulbs by turning them counter-clockwise with your hand and pulling them out. Test fit your bulbs and they might not fit. I trimmed the "small tab" on my bulbs like shown in the picture so they would fit.
![Image]()
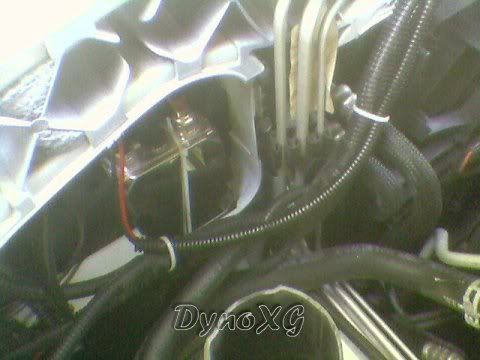
Step 6:
Find a place where you want to mount your ballasts. I placed mine behind the headlight housing as shown in the picture. I put 3M double sided tape on the bottom and held it with zip ties. Make sure it's not loose.
![Image]()
Step 7:
You will need a relay harness and capacitor (see step 8 for capacitor) to keep the lights from flashing like disco strobe lights. Your HID kit might have already come with one. You only need one harness for two lights. If you purchase your HID's from ebay seller HIDGate, you can tell him to include his anti-flicker capacitors for free and you will NOT need to buy the relay harness or the capacitor. Other sellers sell the anti-flicker kit as well. I suggest you contact them and ask if they have one for the Charger.
Although HIDgate's HID kits are cheap, they are not of excellent quality. If you want a quality HID kit I recommend you buy from our supporting member here Advanced Automotive Concepts - AAC ( http://www.aacstyle.com ). Tell them you have a Charger and that you're a member here and they will also provide you with the anti-flicker kit, not to mention their products have a lifetime warranty. I highly recommend this company and had great customer support when I bought my halo's from them.
If you would like a relay harness like the one I purchased, you can get it from Ebay by searching for "HID Harness", then choose to see only "buy it now" items, and then sort the results by price. Right now you can buy them for about $10 shipped. Here's a picture of the relay harness and the wiring diagram. Note that you will not be using connectors "F" and "G" since you already removed these from the bulbs previously.
![Image]()
![Image]()
(note: in the image above, you will not use connectors F and G. You already cut these off and don't need them.)
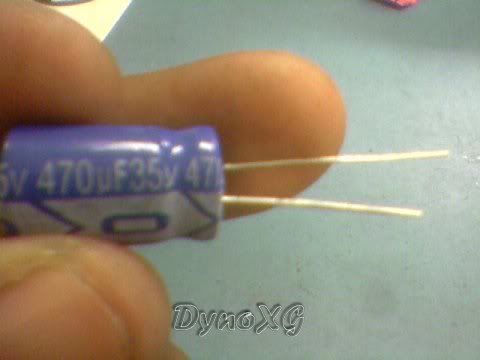
Step 8:
You will need to add a capacitor to the relay harness (read Step 7 before buying, you may not need it). Its a 470µF 35V capacitor. You can find it at any RadioShack store for $1.29 each, their catalog # is 272-1030. I recommend you getting two just in case you plug it in backwards and it pops. Theirs is black, but I used a blue one. Note that one side of the capacitor has a stripe, this side is the negative (-) side. The side without the stripe is the positive (+) side. Here's a link to the item: Capacitor
![Image]()
Step 9:
Remove the relay from the harness by simply pulling it off, don't worry about orientation, it only goes in one way. Install the capacitor as shown in the picture. The stripe goes to the negative (-) pin. Member RAK_Charger_R/T let us know you can check this by checking the color of the wire on the harness. Black (-) and Red (+). Some will be backwards compared to my picture, so if your capacitor pops or blows up when you turn the lights on, replace it but switch it around.
![Image]()
Re-install the relay like shown in the picture. I recommend wrapping the relay and capacitor with black electrical tape to keep it in place and prevent moisture and water from reaching it.
![Image]()
Step 10:
Find a place where you would like to place the relay. I slid mine under the fuse box by where the jump starting cables are like shown in the picture. Zip tie the harness down, but do not include the black ground wire from the harness.
![Image]()
Step 11:
Pass the ground (black) wire through this slot and pull it out from the other side.
![Image]()
Step 12:
Attach the ground wire to the chassis ground wire as shown.
![Image]()
Step 13:
Open the small red (+) box next to the fuse box. Slide the power (red) wire UNDER the box and onto the post. Bolt it back up and close the box.
![Image]()
![Image]()
Step 14:
Slide the red cable and fuse under the fuse box. You may want to wrap the fuse with electrical tape.
![Image]()
![Image]()
Step 15:
Zip tie the long black plastic cable across to the other side and connect the relay harness to both ballasts, then connect both ballasts to both bulbs.
![Image]()
Step 16:
Finally, connect the relay harness to the factory car light bulb plug. You will only connect it to the passenger's side. You can wrap the driver's side OEM plug with electrical tape if you wish. BEWARE not to connect it wrong. Notice that RED goes to WHITE, and Black to Black. My connector didn't "click" together, so I had to wrap it with electrical tape.
![Image]()
Step 17:
Test your lights. Make sure they don't flash when you turn on the car.
EDIT: The HID god has spoken, and has requested this information be added. (ChargeRonDavinS)
![Image]()
![Image]()
Step 18:
Go back to the place where you took the picture of your original lights so you can adjust your new HID's. You will need a TORX #20 driver. Adjust the lights like shown in the picture. I recommend trying to aim them as low as possible.
![Image]()
![Image]()
Step 19:
Walk towards the fridge. Open door using primary hand. Take out six pack of beer and enjoy. Just don't go driving after that.
This is a step by step. I am not a professional installer, so I'm putting this up with many pictures in hopes of helping someone with their installation.
You will need the following, in order of use:
1. Camera
2. HID Kit (2 ballasts and 2 HID bulbs)
3. Wire cutters
4. Pliers
5. Zip ties
6. Relay Harness (see Step 7 for purchasing info). You only need one harness, not two. If you purchase your HID's from ebay seller HIDGate, you can tell him to include his anti-flicker capacitors for free and you will NOT need to buy the relay harness or the capacitor. Other sellers sell the anti-flicker kit as well. I suggest you contact them and ask if they have one for the Charger.
7. 470µF 35V capacitor (read Step 7 before buying, see Step 8 for purchasing info)
8. Electrical tape
9. TORX #20 driver
Level of difficulty: Beginner
The installation will take an average of about 1 hour to 1.5 hours without being rushed.
STEP 1:
Find a wall at night time and take a picture of your stock lighting against a wall. Remember the distance and place, so you can come back when you're done to adjust your HID's.
STEP 2:
You will receive two ballasts and two bulbs. Here's a picture of one of the bulbs.

Cut the grommet off, but be very careful not to cut the wires.

You will be left with just the bulb and the two wires. You will not be using the grommet or the other wires that were removed.

At this point in time, you may want to jump to Step 7-9 and complete those first before you continue to STEP 3.
STEP 3:
On an SXT, disconnect the tube with the arrow by just pulling it off and remove the screw the other arrow is pointing to.


Step 4:
Pull up the filter box carefully, but with a bit of force and set it aside.

Step 5:
*EDIT*
Before you continue with step five, read this thread by NBx33. It may save you from getting a headache. Thanks NBx33:
http://www.chargerforums.com/forums/showthread.php?t=113735
You may not have to do this step if the bulbs in your kit fit the housing correctly. Remove the original bulbs by turning them counter-clockwise with your hand and pulling them out. Test fit your bulbs and they might not fit. I trimmed the "small tab" on my bulbs like shown in the picture so they would fit.

Step 6:
Find a place where you want to mount your ballasts. I placed mine behind the headlight housing as shown in the picture. I put 3M double sided tape on the bottom and held it with zip ties. Make sure it's not loose.
Step 7:
You will need a relay harness and capacitor (see step 8 for capacitor) to keep the lights from flashing like disco strobe lights. Your HID kit might have already come with one. You only need one harness for two lights. If you purchase your HID's from ebay seller HIDGate, you can tell him to include his anti-flicker capacitors for free and you will NOT need to buy the relay harness or the capacitor. Other sellers sell the anti-flicker kit as well. I suggest you contact them and ask if they have one for the Charger.
Although HIDgate's HID kits are cheap, they are not of excellent quality. If you want a quality HID kit I recommend you buy from our supporting member here Advanced Automotive Concepts - AAC ( http://www.aacstyle.com ). Tell them you have a Charger and that you're a member here and they will also provide you with the anti-flicker kit, not to mention their products have a lifetime warranty. I highly recommend this company and had great customer support when I bought my halo's from them.
If you would like a relay harness like the one I purchased, you can get it from Ebay by searching for "HID Harness", then choose to see only "buy it now" items, and then sort the results by price. Right now you can buy them for about $10 shipped. Here's a picture of the relay harness and the wiring diagram. Note that you will not be using connectors "F" and "G" since you already removed these from the bulbs previously.


(note: in the image above, you will not use connectors F and G. You already cut these off and don't need them.)
Step 8:
You will need to add a capacitor to the relay harness (read Step 7 before buying, you may not need it). Its a 470µF 35V capacitor. You can find it at any RadioShack store for $1.29 each, their catalog # is 272-1030. I recommend you getting two just in case you plug it in backwards and it pops. Theirs is black, but I used a blue one. Note that one side of the capacitor has a stripe, this side is the negative (-) side. The side without the stripe is the positive (+) side. Here's a link to the item: Capacitor
Step 9:
Remove the relay from the harness by simply pulling it off, don't worry about orientation, it only goes in one way. Install the capacitor as shown in the picture. The stripe goes to the negative (-) pin. Member RAK_Charger_R/T let us know you can check this by checking the color of the wire on the harness. Black (-) and Red (+). Some will be backwards compared to my picture, so if your capacitor pops or blows up when you turn the lights on, replace it but switch it around.

Re-install the relay like shown in the picture. I recommend wrapping the relay and capacitor with black electrical tape to keep it in place and prevent moisture and water from reaching it.

Step 10:
Find a place where you would like to place the relay. I slid mine under the fuse box by where the jump starting cables are like shown in the picture. Zip tie the harness down, but do not include the black ground wire from the harness.

Step 11:
Pass the ground (black) wire through this slot and pull it out from the other side.

Step 12:
Attach the ground wire to the chassis ground wire as shown.

Step 13:
Open the small red (+) box next to the fuse box. Slide the power (red) wire UNDER the box and onto the post. Bolt it back up and close the box.


Step 14:
Slide the red cable and fuse under the fuse box. You may want to wrap the fuse with electrical tape.


Step 15:
Zip tie the long black plastic cable across to the other side and connect the relay harness to both ballasts, then connect both ballasts to both bulbs.

Step 16:
Finally, connect the relay harness to the factory car light bulb plug. You will only connect it to the passenger's side. You can wrap the driver's side OEM plug with electrical tape if you wish. BEWARE not to connect it wrong. Notice that RED goes to WHITE, and Black to Black. My connector didn't "click" together, so I had to wrap it with electrical tape.

Step 17:
Test your lights. Make sure they don't flash when you turn on the car.
EDIT: The HID god has spoken, and has requested this information be added. (ChargeRonDavinS)


Step 18:
Go back to the place where you took the picture of your original lights so you can adjust your new HID's. You will need a TORX #20 driver. Adjust the lights like shown in the picture. I recommend trying to aim them as low as possible.


Step 19:
Walk towards the fridge. Open door using primary hand. Take out six pack of beer and enjoy. Just don't go driving after that.
") . That's great, that's a good idea, switching the wires on the connector.
. That's great, that's a good idea, switching the wires on the connector.

