Charger Forums banner

Engine Bay Lighting Project

2.8K views 11 replies 3 participants last post by  bfenty  
#1 ·
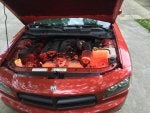
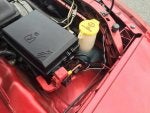
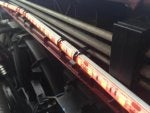
Getting ready for cruise in season, decided to put in some engine bay lighting. I can post some how to info if people are interested-this actually took very little time to do and, I think, looks great.
 

Attachments

#4 ·
Trying to include photos of everything.

The pressure switch is on the passenger side near the cabin air filter-there's a plastic piece that normally goes here, I just took it off and left it off. The original hole was too large so I fabbed a piece of metal with the right diameter while to put over the original. The pressure switch connects to the negative wire of the lights and grounds the same place you would ground if you're jumping the car-a small bolt behind the fuse box.

The lights positive comes directly off the batter positive pin (attached to the fuse box). I added an inline fuse holder for safety-didn't want a short causing a fire.

The lights themselves are just zip tied to two pieces of aluminum cut to fit and accommodate a bend in the middle. The whole light assembly is then zip tied to the A/C lines above the radiator. I wasn't sure if this was a good idea but the lines seem to be quite sturdy and the light assembly weighs almost nothing.

A note on the lights:The LEDs are from Supernight, you can pick them up in 16ft rolls on Amazon or eBay quite cheaply. I won't use any other brand-they're incredibly bright and more durable than any others I've used (not indestructible but pretty good). I've had them in various applications running near 24/7 for years without issue. I'm sure there are other good brands out there but these are what I recommend.
 

Attachments

#5 ·
Looks good but I have a few suggestions.

I would redo the switch. The metal plate can be replaced with a washer, painted black. I would also put the plastic piece on. It also keeps water off the PCM. Not having it there may lead to problems down the road. This would also provide a more finished look.

Wire loom is your friend. It makes for a cleaner looking install AND it protects the wiring from rubbing and chafing. Picture #4 is a particular problem, where you have wiring passing through the round hole in the metal bracket. That WILL eventually rub you a short circuit. What I would suggest is rerouting the wire underneath the radiator support, hiding it in loom, until you reach the existing factory loom. If there is room run the wire through the factory loom, if not run it in a second loom and wire tie it to the factory loom. This will let you run the wire in a hidden manner to the power point. Run the loom right up to the power point. This will both keep the wiring from distracting from the lighting job and will remove any potential shorts caused by wire rubbing.
 
#9 ·
It was never for me to be happy, but yes. Yes, I am happy. That looks a lot better. You'll be happy too, when your lights don't short out because of a rubbing wire and when people compliment the install.

I'd add a bit more loom to the bit that goes into the power point to cover that yellow terminal and red wire. They make 3/16 inch loom, and a rounded notch cut into the red cap would let you hide that wire completely.